Thursday, 29 August 2019

How to backup your Google Gmail content SPOILER; Team Drive is not supported

If you are closing down a G Suite account (or just a standard personal GMail account - although I can't think why you'd ever do that!?), than you can store all the mail content offline by syncing a Thunderbird mailbox to it, and then changing the password so that the IMAP no longer ever syncs. Wow - that;s a good idea which I only just now thought of! You could then copy (or rename) the Thunderbird Profile folder - and load it as a different account.
You could then even selectively copy or move content by older or individually into another [live] gmail or other IMAP account to sync the content up.
Voila.


In addition to the takeout mentioned next, the GSuite Migration Tool from within the admin console would be the first thing to try. All email form the old box appears in the new box - but where? (More to follow on this... see Jake's blog https://jakebinstein.com/)

https://support.google.com/a/answer/6351475?hl=en-GB&ref_topic=6351498
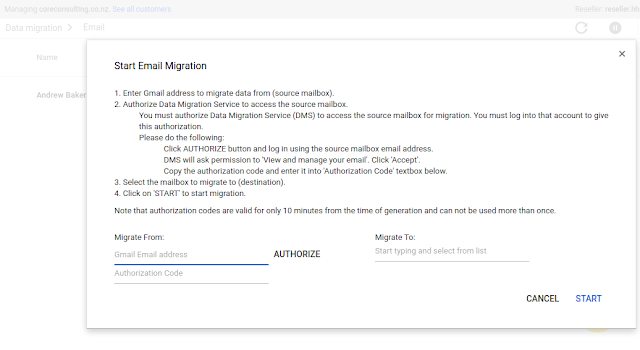

Successfully migrated 21766 emails
3 emails failed to be migrated
Details
Migration Status
Complete
Successfully migrated 21766 emails
3 emails failed to be migrated
Download Migration Error Details
Connection Settings
Migration Server:
Gmail
Connection Protocol:
IMAP
Email Server:


If you prefer, (or in addition) you should use the account takeout service prior to disbanding...
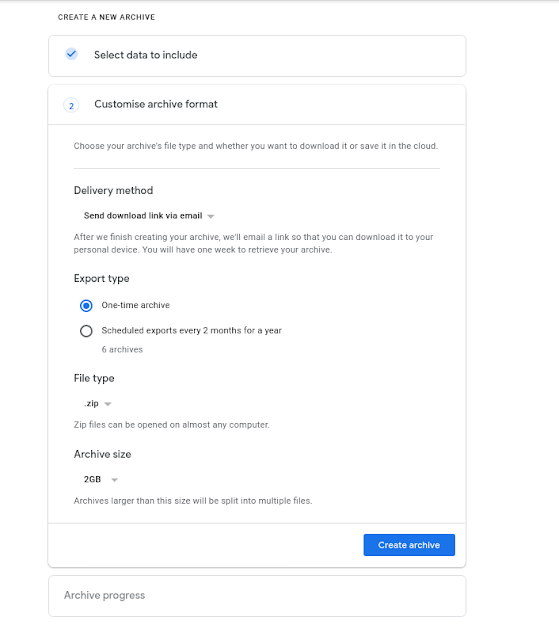
This allows you to selectively zip up the data content of all your google services, and mailbox in MBOX format, and download some large files google make available.

Actually making using of these backups however is not so easy.
Importing the MBOXs into Thunderbird appears to be the most common advice.

A good guide covering all this for both PC and Mac https://www.makeuseof.com/tag/use-downloaded-gmail-data/


However, GYB is another option. I haven't yet tried it, but it looks promising:


Head over to takeout to start the process:


There is only one entry for Drive - nothing for Teams Drive (another Blog to come on this!)


Under Mailbox, there are options to choose labels - not sure if this excludes those not selected!?!?


In Step 2 there are options as to how to access the files:


The archives look like this.


Adventures changing pickup rollers on a Fuji Xerox CM415

If you struck this problem - and solved it - please skip to another site right now!

In a printer with an additional main tray, the lower tray rollers change in a snap.
The primary tray rollers, however refuse to come off as there is a plastic cover in the way.. still not sure what it's function is - other than for me to create this post!

The trick is to release the catch and slide the cover to the left. It comes off easily and the rollers can be accessed. (Some say you may need to remove the grey plastic plate below the black plate with one screw - but I could push past that without removing it).

Some helpful photos


Tuesday, 12 February 2019

The Cloud - for non technical audiences - a shared Google Slides presentation

This is a Google Slides presentation shared for public visibility: Take a look at this 10 minute presentation on my explanation of The Cloud to a non-technical audience - what it is and how it can be used - with an example of email hosted in the cloud (versus the old POP method)


How do I get a new iCloud email address? Simple, you'd think!


When setting up a new idevice for a customer who has never had an iCloud account [gasp] you will need a new iCloud account?
No problem - but you will need a valid email address against which to authenticate!

But hang on, the iCloud email is not yet active...

On your new iPad, you get to login the first time with this validating email - not your new iCloud email  - as it has not yet been enabled!!!

Within the online icloud.com portal, there is no switch to turn on the iCloud email.

Instead you need to go into the iPad's AppleID Accounts settings and in the iCloud entry, you are able to switch on the iCloud email...

Only THEN is the new email address of your choosing active!

This is where you turn it on


The last step is to change the Appleid to the iCloud address rather than the illogical gmail address :)
as follows:


Thanks to this post for the pointers:

The steps seem strange, but first you must create your appleid using a non Apple address (note that if you already have an @icloud, @mac, or @me email address that email address is already an Apple ID)
Once your Apple ID has been created, on the device go to Settings > iCloud and flip the mail switch on, you will be prompted there to create your @icloud.com email address.
Alternatively, you can go to setting and go to mail. From there, add account and choose iCloud. If you choose "create Apple ID" at this screen, for whatever reason, it will allow you to create an "@icloud.com" email.

Thursday, 26 October 2017

Selective restore to another user's iMac on OSX 10.10.5 Yosemite (early 2017)

Rather than restoring an entire set of files settings and apps, the Migrate Wizard can be used to import part of your Time Machine content.


If you accidentally click through too fast on the Migrate Wizard steps, and choose to restore everything, fear not.
The new user you have created in the Migrate process will have all the files settings etc from which you can choose. (If you started the Migrate process from the Guest account, it still creates the new user over the top of the Guest account (huh?) - so that is one to watch out for.

But how do you access the files of the new user? Login as the newly created account I hear you say. Yes, but what if the password for that old restored account is long lost?!?!


Using sudo chmod -R 777 in the terminal is a bit scary, so an easier way is to navigate to the folder of the new user. (Log back in to your own user).

The simplest method is to drag the folder with a red no entry sign pops up this authorisation dialog

which appears to do the trick!


I wasn't sure if this method allowed all the sub folders to be copied.. 
So I also tried a slightly longer-winded way of changing the permissions:

From the folder in question, choose Get Info.
From there the trick is to unlock the padlock (bottom right)


And then ADD your account as a Full read & right permission using the + and the Privilege spinner


With that done, the drag an drop copy still prompts for authorisation, but appears to recursively copy everything.


So far so good.

Sunday, 8 January 2017

Fresh Windows7 installs failing to update?

Follow these instructions

https://www.youtube.com/watch?v=WFfc22x3I_s

Takeaways:

Get the two manual updates, but STOP the windows update service BEFORE you install them.
Restart in between.
Then let Windows update continue as normal. - Give it time.

Good luck

Monday, 19 December 2016

Windows 10 not shutting down? Disable fast startup - here's how

Despite the myriad slew of suggestions tweaking power settings, even delving into the BIOS - simply disable Fast startup - it's worked for me 6 of 6 times!


Job done